jQuery不要で利用できるJavascriptプラグイン【Swiper】を紹介します。
色々なスライダーを設定でき、レスポンシブにも対応しているため、非常に使いやすい高機能スライダーです。
導入方法から基本設定・応用設定までを解説します。
Swiperをダウンロード〜設定
Swiperのダウンロードページからzipファイルをダウンロードします。
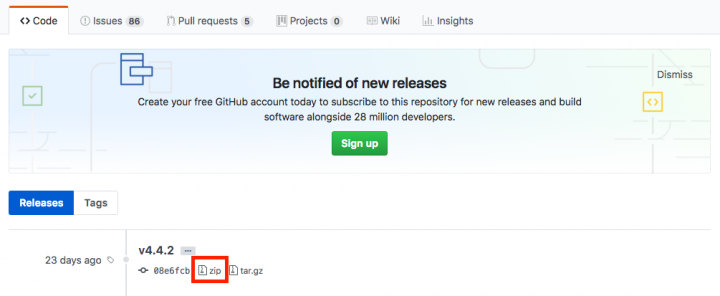
最新バージョンの『zip』をクリックすると自動でダウンロードできます。
必要なファイルは、
dist > css > swiper.min.css
dist > js > swiper.min.js
この2つのファイルをフォルダに配置し、headタグ内で読み込みます。
<head>
// 省略
  <link rel="stylesheet" href="./css/swiper.min.css" type="text/css" />
// 省略
  <script defer src="./js/swiper.min.js"></script>
// 省略
</head>
これで準備完了です。
HTML
<section class="swiper-container">
	<div class="swiper-wrapper">
		<div class="swiper-slide">
			<img src="./img/top/***.png">
		</div>
		<div class="swiper-slide">
			<img src="./img/top/***.png">
		</div>
		<div class="swiper-slide">
			<img src="./img/top/***.png">
		</div>
	</div>
</section>swiper-container一番外側につけるクラス
swiper-wrapperコンテンツを囲むクラス
swiper-slideスライダーコンテンツ自体につけるクラス
Javascript
<script>
	window.onload = function() {
		var mySwiper = new Swiper ('.swiper-container', {
			loop: true,
			slidesPerView: 1,
			autoplay: {
				delay: 6000,
			},
			slideActiveClass: 'active',
			speed: 800,
			simulateTouch:false,
		});
	}
</script>
これが基本形です。
HTMLファイルに直接書き込む場合は、window.onload = function() { }で囲まないと動かない。
Swiperで使えるオプション
| オプション | 説明 | 値 | ||
|---|---|---|---|---|
| effect | スライドの切り替わり方を指定。 | slide、fade、cube、coverflow、flip | ||
| slidesPerView | ページに表示するスライドコンテンツの数を指定。2.5などの少数を設定することも可能。 | 数値 | ||
| spaceBetween | スライドコンテンツ間のmarginを指定。pxの値で出力。 | 数値 | ||